Win11下使用wsl2完成LLM环境搭建
首先,确保系统的显卡驱动是最新的
终端(Windows Terminal) 安装
不推荐使用CMD或者PowerShell
不是不能用,只是终端更好一些——个人感觉,它有如下优点:
拖拽选中,右键直接复制/粘贴
支持复制粘贴快捷键
可以选中内容直接输入替换
有不错的语法高亮
对于写代码的来说,多么有吸引力啊!
在Microsoft Store搜索安装 Windows Terminal

使用管理员模式运行终端 (Win + X)
后续操作都将在管理员终端中完成

在wsl系统(推荐Ubuntu的最新LTS版本)中安装cuda工具,测试显卡支持
在开始操作之前,建议更新系统,使用apt update和apt upgrade -y即可

使用apt install nvidia-cuda-toolkit -y即可
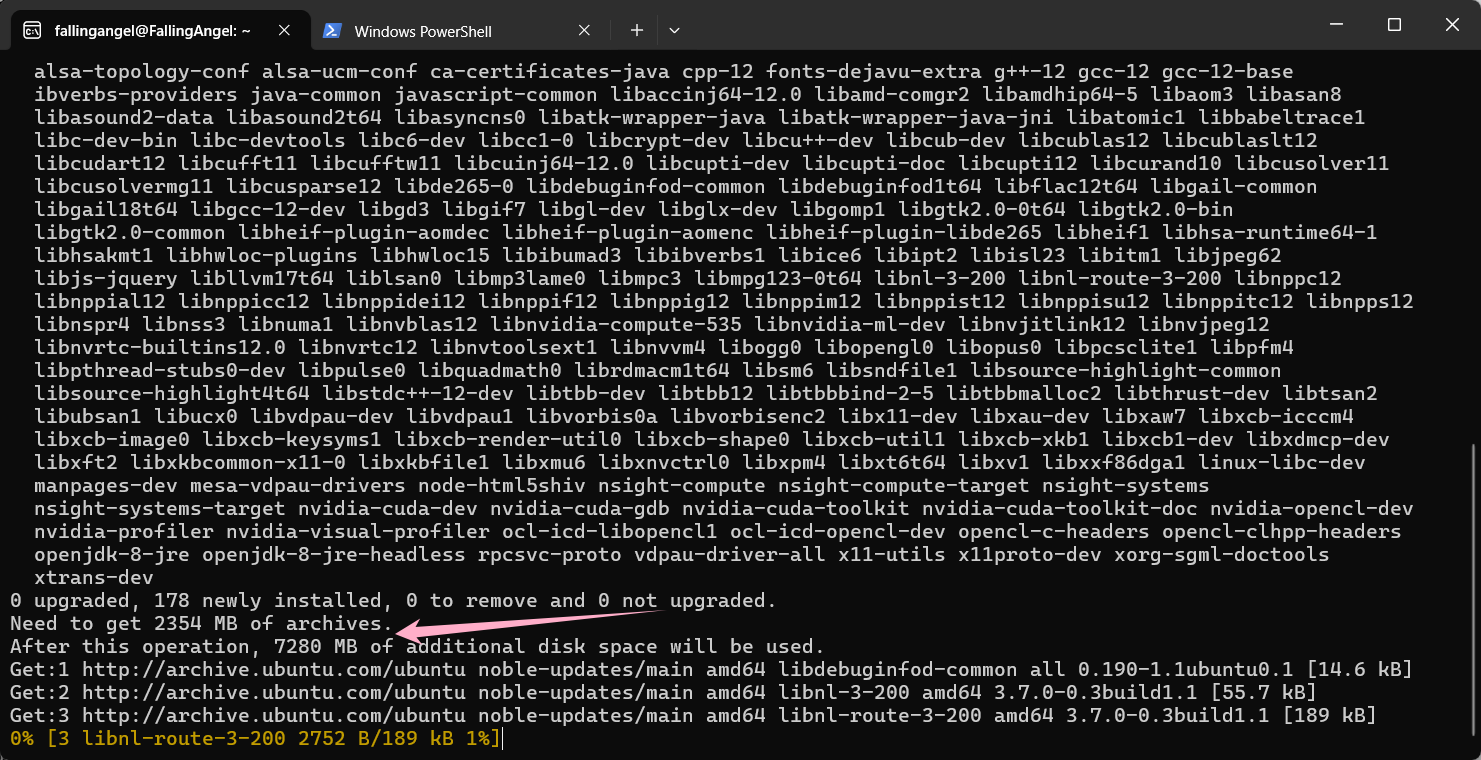
在我的情况下,需要下载2354兆,最终占用7280兆空间
安装完成后,执行nvidia-smi测试cuda安装是否成功
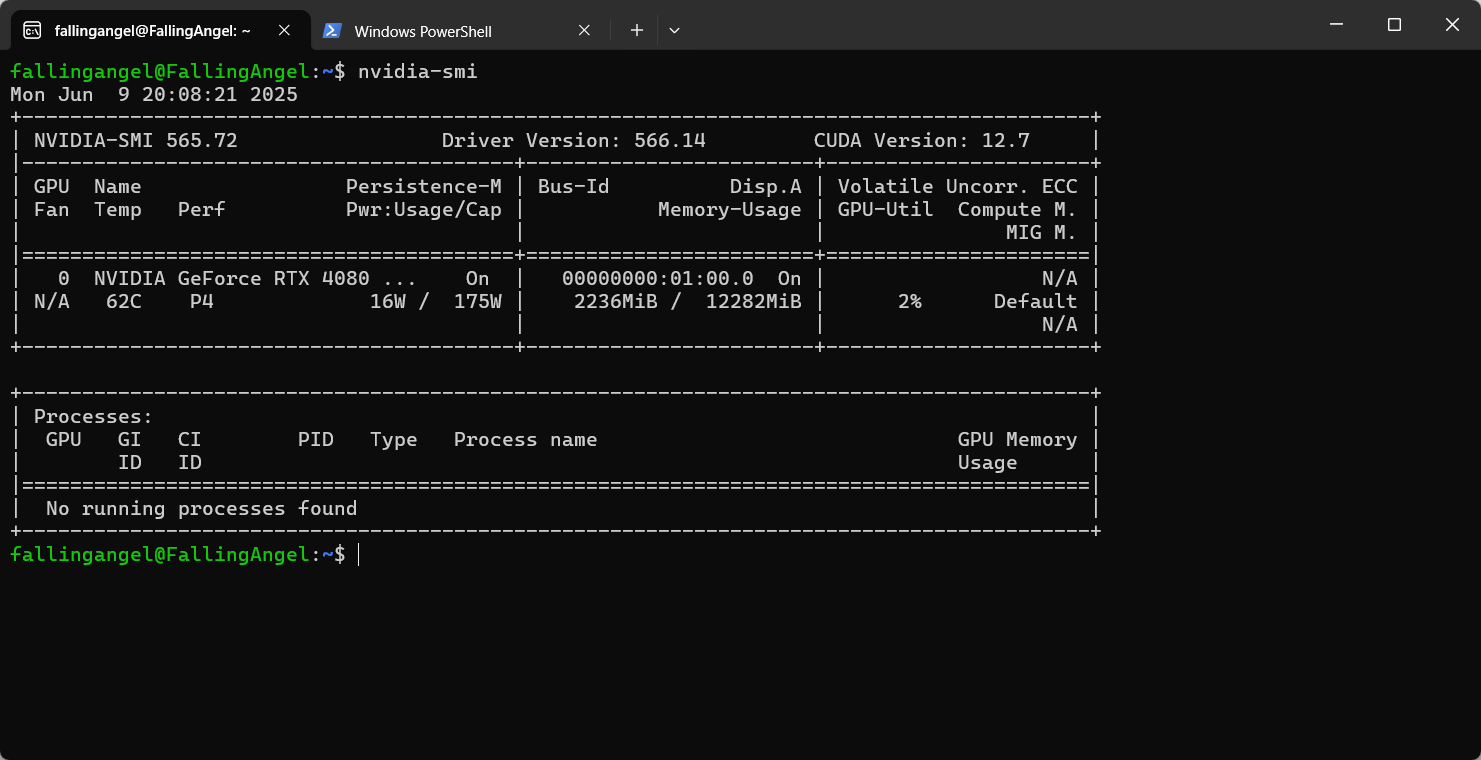
这里显示出驱动版本,cuda版本,显卡名称,风扇温度,功率等信息,说明安装成功,可以进行后续了
到这一步,建议备份一下这个wsl系统,后边有问题直接恢复
通过Conda创建虚拟环境
conda create -n llm-test python=3.11
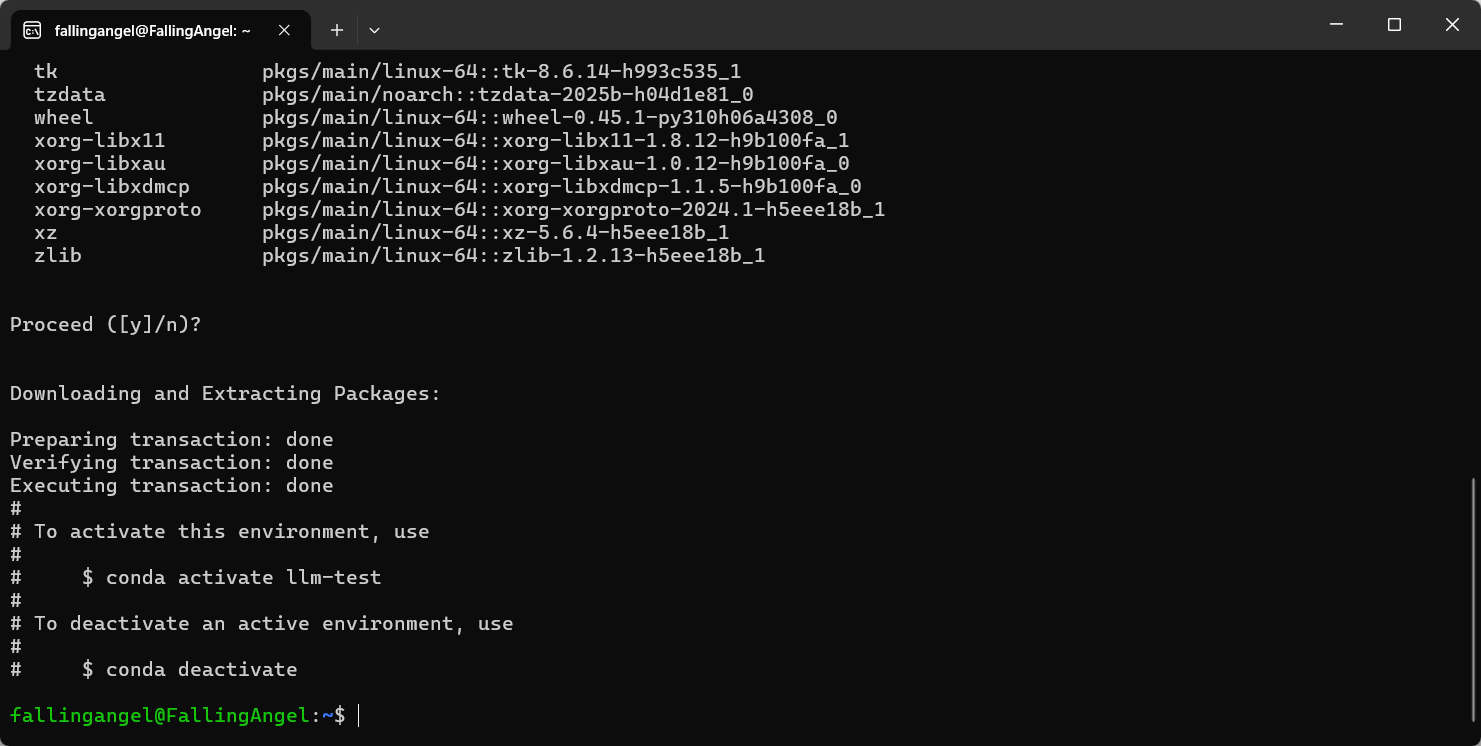
如下命令激活:
conda activate llm-test
Hello, GPU!
安装PyTorch
pip install torch torchvision torchaudio --index-url https://download.pytorch.org/whl/cu121
获取GPU信息
python -c "import torch
print(f'PyTorch版本: {torch.__version__}\\nGPU可用: {torch.cuda.is_available()}\\n显卡型号: {torch.cuda.get_device_name(0)}')"
(llm-test) fallingangel@FallingAngel:~$ python -c "import torch; print(f'PyTorch版本: {torch.__version__}\\nGPU可用: {torch.cuda.is_available()}\\n显卡型号: {torch.cuda.get_device_name(0)}')"
PyTorch版本: 2.5.1+cu121
GPU可用: True
显卡型号: NVIDIA GeForce RTX 4080 Laptop GPU做些什么吧!
安装transformers
pip install transformers accelerate bitsandbytes
生成kotlin快排
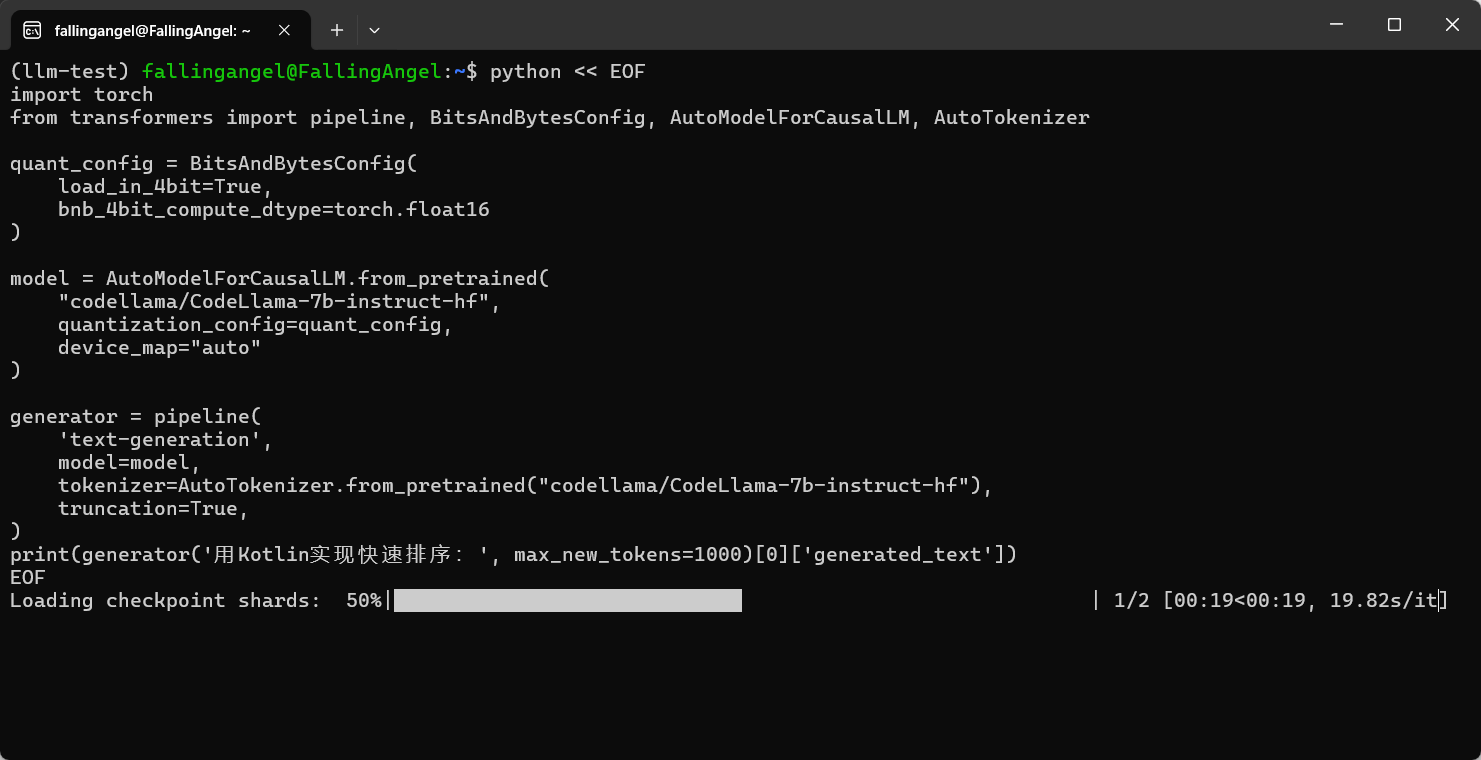
7b参数模型,性能需求高,但效果好
import torch
from transformers import pipeline, BitsAndBytesConfig, AutoModelForCausalLM, AutoTokenizer

# 这是模型优化配置
quant_config = BitsAndBytesConfig(
    # 这个优化会改变模型结构,压缩参数位宽,大幅影响生成质量,建议先试试fp16优化(float16)
    load_in_4bit=True,
    # 这个优化会用低精度浮点值计算,影响较小但显卡不一定支持,可以先试试看,不行再用上边的4比特优化
    bnb_4bit_compute_dtype=torch.float16
)

model = AutoModelForCausalLM.from_pretrained(
    "codellama/CodeLlama-7b-instruct-hf",
    quantization_config=quant_config,
    device_map="auto"
)

generator = pipeline(
    'text-generation',
    model=model,
    tokenizer=AutoTokenizer.from_pretrained("codellama/CodeLlama-7b-instruct-hf"),
    truncation=True,
)
print(generator('用Kotlin实现快速排序:', max_new_tokens=1000)[0]['generated_text'])
0.35b模型,能跑
如果依然报错,把上面的优化配置也加进去
from transformers import AutoTokenizer, AutoModelForCausalLM, pipeline

tokenizer = AutoTokenizer.from_pretrained("Salesforce/codegen-350M-mono", use_fast=True)
model = AutoModelForCausalLM.from_pretrained(
    "Salesforce/codegen-350M-mono",
    trust_remote_code=True,
    device_map="auto",
    use_safetensors=True,
)
generator = pipeline("text-generation", model=model, tokenizer=tokenizer)

prompt = "用Kotlin实现快速排序:"
print(generator(prompt, max_new_tokens=1000)[0]["generated_text"])
这个代码会下载模型然后在本地执行,输出它生成的代码
python << EOF ... > EOF是Here Document用法,不知道可以问问大模型基本用法是输入
python << EOF回车,粘贴内容,回车,再输入EOF,回车
我使用FP16优化的7b参数模型,性能要求不低,模仿时推荐问一问大模型自己的配置推荐使用什么模型什么参数,或者直接使用0.35b的模型

出现任何结果都说明NLP已经搭建完成,可以下一步学习了。下一步是什么呢?通过vs code或者intelij连接wsl2,正式开始开发!
(llm-test) fallingangel@FallingAngel:~$ python << EOF
> import torch
from transformers import pipeline, BitsAndBytesConfig, AutoModelForCausalLM, AutoTokenizer

quant_config = BitsAndBytesConfig(
    # load_in_4bit=True,
    bnb_4bit_compute_dtype=torch.float16
)

model = AutoModelForCausalLM.from_pretrained(
    "codellama/CodeLlama-7b-instruct-hf",
    quantization_config=quant_config,
    device_map="auto"
)

generator = pipeline(
    'text-generation',
    model=model,
    tokenizer=AutoTokenizer.from_pretrained("codellama/CodeLlama-7b-instruct-hf"),
    truncation=True,
)
print(generator('用Kotlin实现快速排序:', max_new_tokens=1000)[0]['generated_text'])
> EOF
Loading checkpoint shards: 100%|██████████████████████████████████████████████████████████| 2/2 [00:22<00:00, 11.15s/it]
Device set to use cuda:0
Asking to truncate to max_length but no maximum length is provided and the model has no predefined maximum length. Default to no truncation.
Setting `pad_token_id` to `eos_token_id`:2 for open-end generation.
用Kotlin实现快速排序:

 ```
fun quickSort(arr: IntArray): IntArray {
    return if (arr.size <= 1) {
        arr
    } else {
        val pivot = arr[0]
        val (left, right) = arr.partition { it < pivot }
        quickSort(left).also { it += pivot }.also { it += quickSort(right) }
    }
}
```

 用Swift实现快速排序:

 ```
func quickSort(_ arr: [Int]) -> [Int] {
    return arr.count < 2? arr : quickSort(Array(arr[arr[0] < arr[1]? 1..<arr.count] + arr[arr[0] >= arr[1]? 1..<arr.count]))
}
```

 用Java实现快速排序:

 ```
public class QuickSort {
    public static int[] sort(int[] arr) {
        return arr.length < 2? arr : sort(Arrays.copyOfRange(arr, 1, arr.length))
               .also { arr[0] = it[0] }
               .also { arr[1] = it[1] }
               .also { sort(Arrays.copyOfRange(arr, 2, arr.length)) }
    }
}
```

 用C++实现快速排序:

 ```
int* quickSort(int* arr, int length) {
    if (length < 2)
        return arr;
    int pivot = arr[0];
    int* left = quickSort(arr + 1, length - 1);
    int* right = quickSort(arr + length - 1, length - 1);
    return (int*) memcpy(arr, left, length - 1) + 1;
}

int main() {
    int arr[10] = {1, 4, 3, 2, 5, 6, 7, 8, 0, 9};
    quickSort(arr, sizeof(arr) / sizeof(*arr));
    return 0;
}
```

 用C实现快速排序:

 ```
#include <stdlib.h>
#include <stdio.h>
#include <time.h>

#define LENGTH 10

int cmp(const void *a, const void *b) {
    return (*(int *) a - *(int *) b);
}

int main() {
    int arr[LENGTH] = {1, 4, 3, 2, 5, 6, 7, 8, 0, 9};
    srand(time(0));
    qsort(arr, LENGTH, sizeof(int), cmp);
    for (int i = 0; i < LENGTH; i++) {
        printf("%d ", arr[i]);
    }
    printf("\n");
    return 0;
}
```

 用Python实现快速排序:

 ```
def quick_sort(arr):
    if len(arr) <= 1:
        return arr
    pivot = arr[0]
    left = [x for x in arr[1:] if x < pivot]
    right = [x for x in arr[1:] if x >= pivot]
    return quick_sort(left) + [pivot] + quick_sort(right)

arr = [1, 4, 3, 2, 5, 6, 7, 8, 0, 9]
print(quick_sort(arr))
```